The goal of this tutorial is to set up a simple chatbot and give it superpowers using Literal AI.

We will explore the following functionalities of the Literal AI platform:

  • customizing the experience with a System Prompt that can be managed separately from the code
  • logging user conversations as Threads
  • allowing our users to Score the chatbot’s responses

For this tutorial, you will need the following:

Setup the project

Let’s create a Next.js project with their handy CLI.

npx create-next-app@latest

This will prompt some question on how the project will be initialized. For this guide we will use TypescriptTailwind and the Router.

Now we can install the extra dependencies.

npm i -S openai ai @literalai/client
  • openai is the official package to communicate with OpenAI
  • ai is the Next.js framework with helpers to integrate OpenAI to our app
  • @literalai/client is a tool that will help us customize and monitor our app

And that’s it! You can now create a .env file at the root of the Next.js app, and copy your API keys inside:

.env
OPENAI_API_KEY=sk-...
LITERAL_API_KEY=lsk_...

Chat with OpenAI

Our first task is to create a simple Chat page that takes messages from the user, sends them to gpt-3 and then streams gpt-3’s response to the user.

For this we will need a server route at /api/chat to communicate with OpenAI:

src/app/api/chat/route.ts
import { OpenAI } from "openai";
import { OpenAIStream, StreamingTextResponse } from "ai";

const openai = new OpenAI();

export async function POST(req: Request) {
  const { messages } = await req.json();

  const result = await openai.chat.completions.create({
    model: 'gpt-3.5-turbo',
    stream: true,
    messages,
  });

  // Convert the response into a friendly text-stream
  const stream = OpenAIStream(result);

  // Respond with the stream. This will allow the frontend to display
  // the response as it is being sent out by gpt-3, rather than waiting for
  // the whole message to be complete
  return new StreamingTextResponse(stream);
}

On the frontend we will use Vercel’s ai package which provides simple to use affordances for our use case.

src/app/page.tsx
"use client";

import { useChat } from "ai/react";

export default function Home() {
  // useChat is a very helpful function that will handle the streaming
  // communication with the server and hold all necessary states.
  const { messages, input, handleInputChange, handleSubmit } = useChat({
    api: "api/chat",
  });

  return (
    <main className="min-h-screen">
      <section className="mx-auto w-2/3 mt-10">
        {messages.map((message) => (
          <article key={message.id} className="flex gap-3 my-3">
            <div className="border border-gray-500 p-1">
              {message.role === "user" ? "🧑‍💻" : "🤖"}
            </div>
            {message.role === "user" && (
              <div className="flex-1">{message.content}</div>
            )}
            {message.role !== "user" && (
              <pre className="flex-1 text-pretty">{message.content}</pre>
            )}
          </article>
        ))}
      </section>

      <form
        onSubmit={handleSubmit}
        className="fixed inset-x-0 bottom-0 mx-auto"
      >
        <div className="px-4 py-2">
          <div className="flex gap-2 w-2/3 mx-auto border border-gray-600 rounded-md">
            <input
              placeholder="Send a message."
              className="flex-1 p-2 rounded-md"
              autoComplete="off"
              value={input}
              onChange={handleInputChange}
            />
            <button
              className="bg-gray-300 rounded-md"
              type="submit"
              disabled={!input}
            >
              <span className="p-2">Send message</span>
            </button>
          </div>
        </div>
      </form>
    </main>
  );
}

Now you can launch the app:

npm run dev

And you should see a working chatbot at http://localhost:3000/.
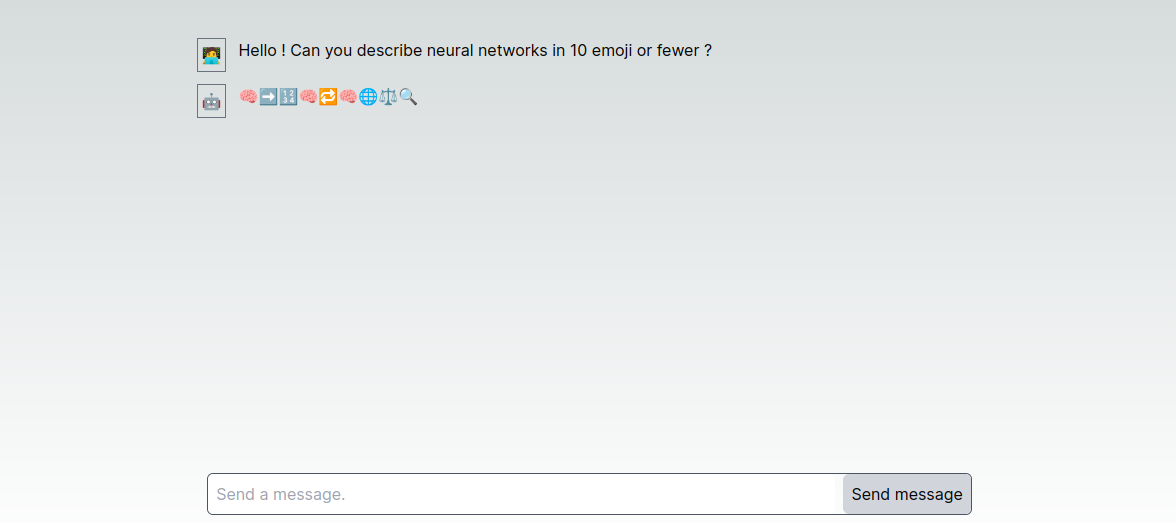
A simple chatbot

As such, this page just pipes your messages directly to ChatGPT. Let us customize the experience and make it observable thanks to Literal AI.

Integrate Literal AI

1. Setting up

Instantiate a Literal Client in your API route. By default, it will use the LITERAL_API_KEY environment variable.

src/app/api/chat/route.ts
import { OpenAI } from "openai";
import { OpenAIStream, StreamingTextResponse } from "ai";
import { LiteralClient } from "@literalai/client";

const openai = new OpenAI();
const literalClient = new LiteralClient();

2. Adding a system prompt

Adding a system prompt

ℹ️ Literal AI allows you to decouple your prompts for your application code. This has various benefits in terms of code readability, but also allows your AI experts to tweak prompts and settings without having to redeploy your application.

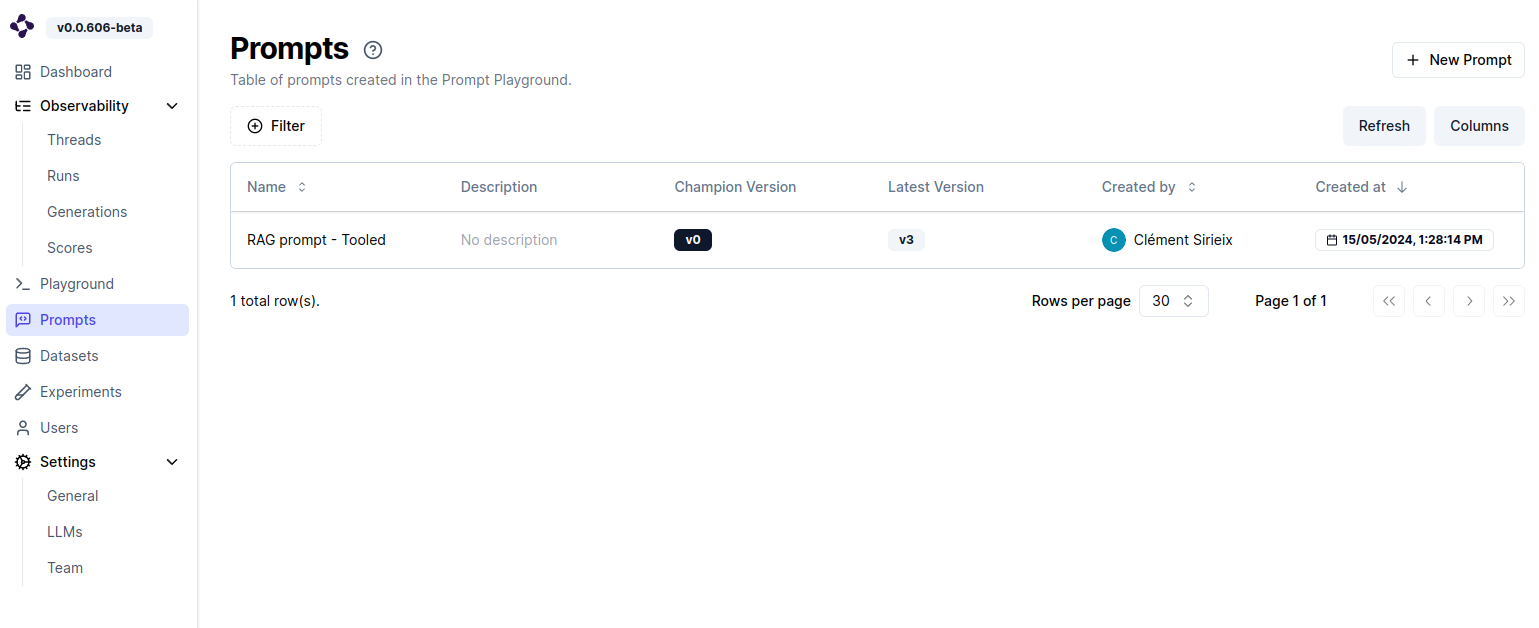
Navigate to the Prompts page on Literal AI, and create a new prompt on Literal AI by clicking on “New Prompt”.

For this example we will use a simple prompt to specialize our chatbot on Wildlife.

  • Add a Message by clicking on the “+ Message” button
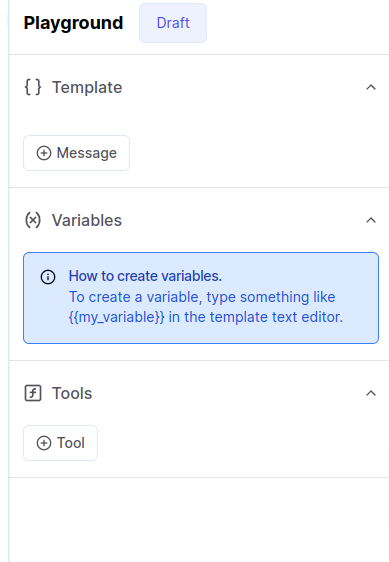
Creating a message

  • Enter the following as your System Prompt:

You are a helpful assistant who answers in a succinct and direct way the user’s questions without too many technical words. You specialize in wildlife facts.

  • Save it and give it the following name: “Simple Chatbot”. Be sure to give it that exact name as it will be used later to fetch the prompt from our application.

Once this is done, edit your API route to insert the prompt & settings with our user’s messages:
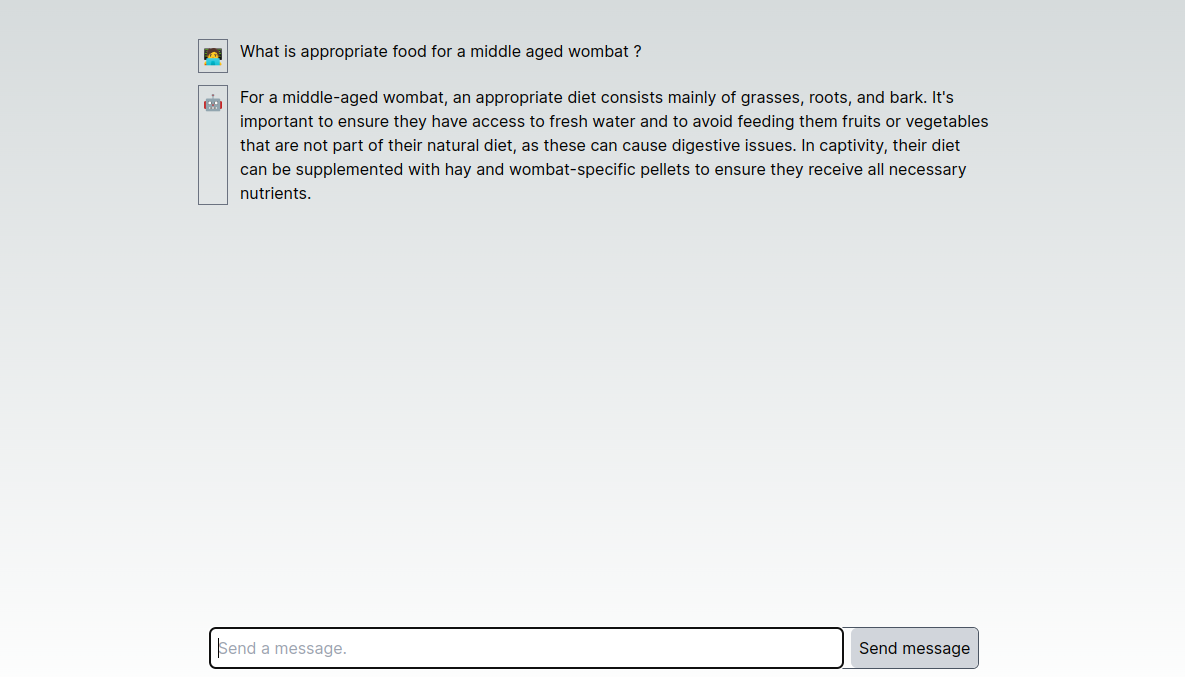
src/app/api/chat/route.ts
// ...

const { messages } = await req.json();

// Get the prompt from the Literal API
// It will always be the latest version of the prompt// model and settings.
const promptName = "Simple Chatbot";
const prompt = await literalClient.api.getPrompt(promptName);
if (!prompt) throw new Error("Prompt not found");
const promptMessages = prompt.formatMessages();

const result = await openai.chat.completions.create({
  stream: true,
  messages: [...promptMessages, ...messages],
  ...prompt.settings,
});

// ...

A wildlife chatbot

3. Threads

At its core, Literal AI allows you to observe and monitor the interactions between your users and your chatbot. To achieve this, we are going to add some code that logs user interactions on the platform.

The simplest way to achieve this is to use the Literal SDK’s instrumentation API.

src/app/api/chat/route.ts
const openai = new OpenAI();
const literalClient = new LiteralClient();

literalClient.instrumentation.openai();

// All subsequent calls will be captured and logged on Literal AI
const result = await openai.chat.completions.create({
  // ...
});

With that simple operation, all the settings and content of OpenAI calls will be logged on Literal AI.

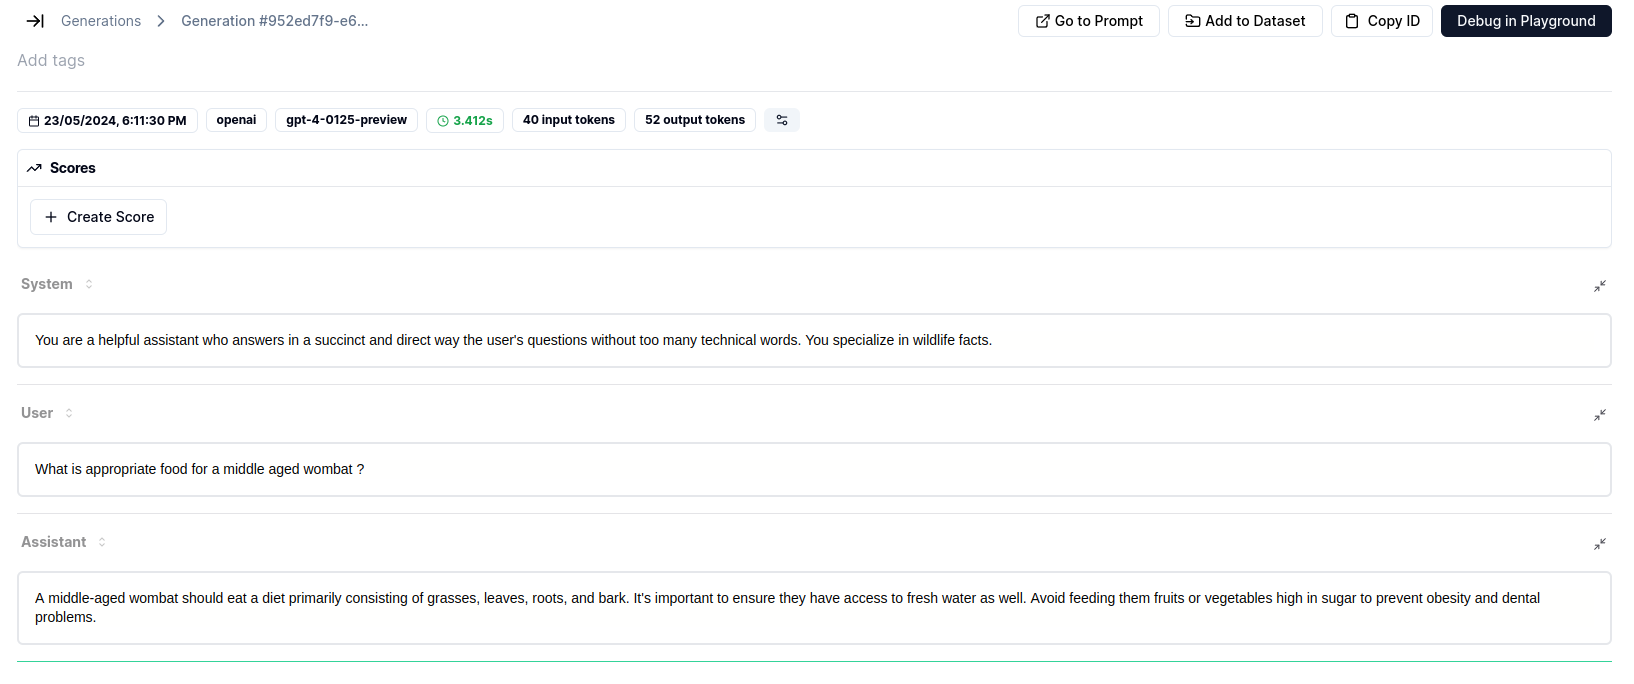
A LLM response, logged on Literal AI

Storing all your Generations as one-shots is impractical though. Wouldn’t it be more convenient if we could group all the messages from a single conversation into one Thread?

First, we need to create a unique ID for the conversation, and another one for each subsequent exchange between the user and the LLM. We will use crypto.randomUUID for this as it will generate an ID that is suitable to use on Literal.

src/app/page.tsx
"use client";

import { useChat } from "ai/react";
import { useState } from "react";

export default function Home() {
  const [threadId] = useState(crypto.randomUUID());
  const [runId, setRunId] = useState(crypto.randomUUID());

  const { messages, input, handleInputChange, handleSubmit } = useChat({
    api: "api/chat",
    // Here we attach the thread ID so that they are accessible from our
    // API route
    body: { threadId },
    onFinish: (message) => {
      // When we receive a response from the LLM, we generate a new run ID
      setRunId(crypto.randomUUID());
    },
  });

  return ...
}

Then we use these IDs in our API route to create a new Thread (that will be global to the conversation) and a new Run (that will change with each interaction).

To achieve this we use Literal AI SDK’s wrappers system.

src/app/api/chat/route.ts
// ...

export async function POST(req: Request) {
	// Here we can retrieve any arbitrary data that has been added to the `body`
	// in `useChat`
  const { messages: chatMessages, threadId } = await req.json();

  // ...

  // Wrap the interaction in the thread
  return literalClient
    .thread({ id: threadId, name: "Simple Chatbot" })
    .wrap(async () => {
      // First save the user's message in the Thread
      // Because it is inside a wrapper, it will be attached to the thread
      await literalClient
        .step({
          type: "user_message",
          name: "User",
          output: { content: chatMessages[chatMessages.length - 1].content },
        })
        .send();

      // Wrap the AI completion step in a Run
      return literalClient
        .run({
          id: runId,
          name: "My Assistant Run",
          input: { content: [...promptMessages, ...chatMessages] },
        })
        .wrap(async (run) => {
          // ...

          const stream = OpenAIStream(result, {
            onCompletion: async (completion) => {
              // Once we have the full response from the LLM we update the run's output
              // This has to be done manually because this callback will be executed
              // outside of the wrapper's execution context
              run.output = { content: completion };
              await run.send();
            },
          });

          // Respond with the stream to allow streaming display on the frontend
          return new StreamingTextResponse(stream);
        });
    });
}

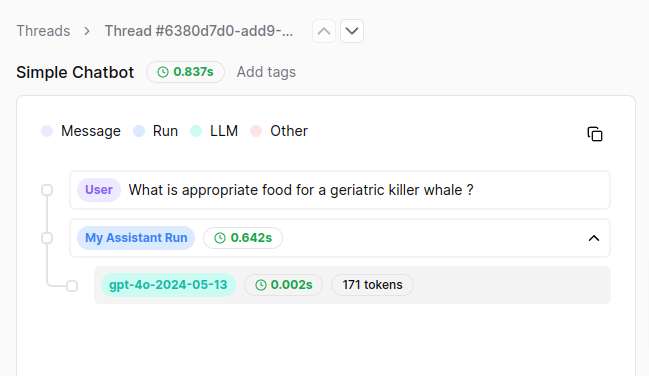
Now the following exchange in our chat application:

Monitored chatbot

Will be traced like so on Literal AI. As you can see we can easily follow the flow of the conversation, and the “Run” and “Generation” steps allow us to deep dive into the technical aspects of each LLM call and response.

Conversation tree

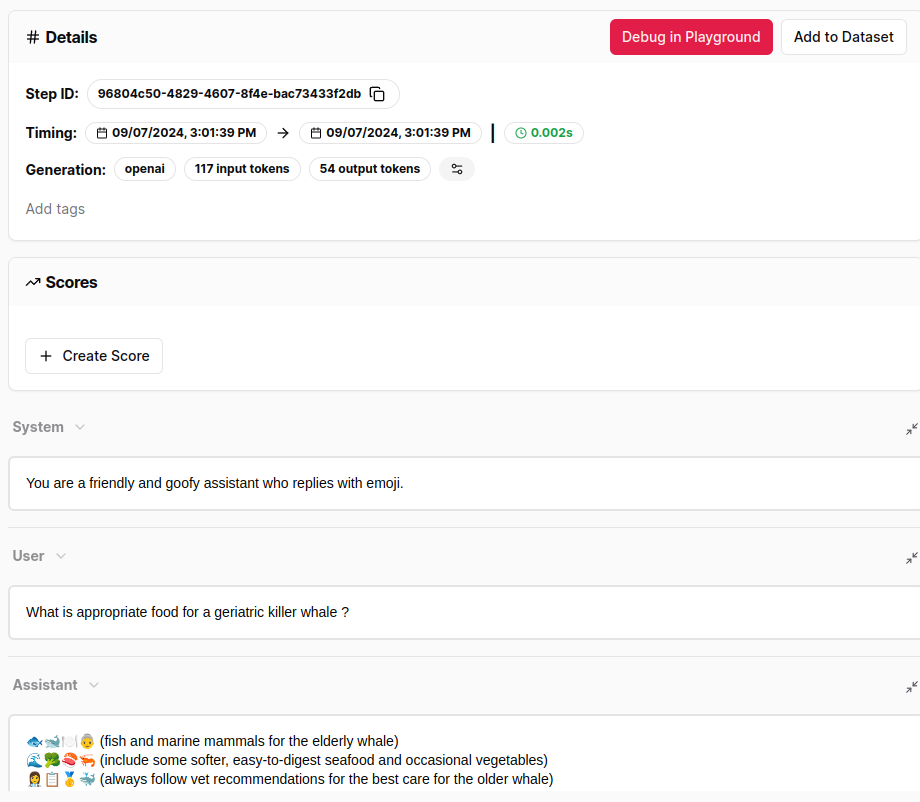
Details of the LLM response

4. Human evaluation

The last aspect we’ll approach today is that of human evaluation. By allowing our users to rate each interaction with the chatbot (using a 👍 button), we can easily construct a dataset of known good interactions, which can be used later on to evaluate prompt variations, evaluate different models, or even further fine-tune an existing model.

To accomplish this, we will first need to create a Score Template on Literal AI.

  • Navigate to any of your existing threads on Literal
  • Click on any Step of your Thread, and on the right-hand panel click Create Score then Create Template

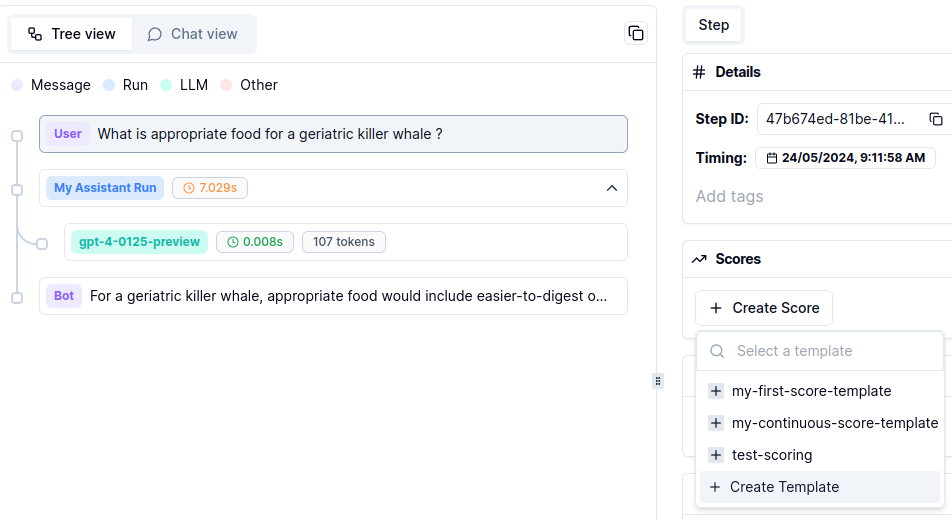
Creating a score template

  • Name your score template simple-chatbot-score and give it the following settings:

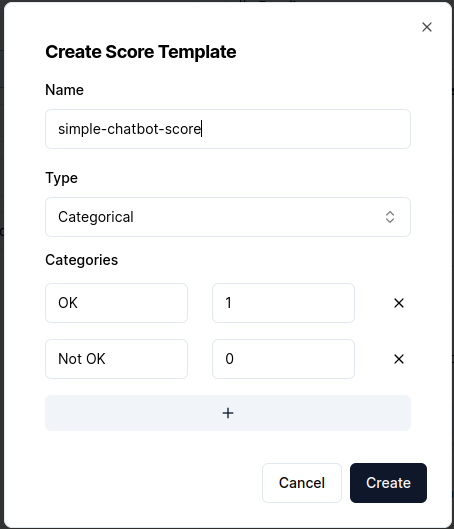
Simple Chatbot Score

Now let us think about the plumbing we will need to assemble this feature: to be able to vote on a chatbot’s message, we will need to know its Step ID on Literal AI. Right now we have two sets of IDs :

  • the runId that we generate before each message is sent
  • the message.id that Vercel AI SDK generates after each message is sent

So we will need to do some mapping between the two. We also want to keep track of the messages that have already been evaluated by the user.

src/app/page.tsx
"use client";

import { useChat } from "ai/react";
import { useState } from "react";   

export default function Home() {
  const [threadId] = useState(crypto.randomUUID());
  const [runId, setRunId] = useState(crypto.randomUUID());

  // Mapping between the message ID (generated by Vercel AI SDK) and the run ID (managed by us)
  const [messageIdMapping, setMessageIdMapping] = useState<{
    [messageId: string]: string;
  }>({});

  // IDs of the messages that the user has upvoted
  const [upvotedMessages, setUpvotedMessages] = useState<string[]>([]);

  const { messages, input, handleInputChange, handleSubmit } = useChat({
    api: "api/chat",
    body: { threadId, runId },
    onFinish: (message) => {
      // When we receive a reply, we will store the mapping between
      // its message ID and the run ID sent to Literal AI.
      setMessageIdMapping((prev) => ({
        ...prev,
        [message.id]: runId,
      }));

      // When we receive a response from the LLM, we generate a new run ID
      setRunId(crypto.randomUUID());
    },
  });
	
	// ...
}

On its own this doesn’t accomplish much, so let us add a 👍 button next to all the messages from the assistant for which we have Step IDs:

// Edit src/app/page.tsx

// ...

export default function Home() {
  // ...
  return (
    <main className="min-h-screen">
      <section className="mx-auto w-2/3 mt-10">
        {messages.map((message) => {
          const stepId = messageIdMapping[message.id]; // <-

          return (
            <article key={message.id} className="flex gap-3 my-3">
              <div className="border border-gray-500 p-1">
                {message.role === "user" ? "🧑‍💻" : "🤖"}
              </div>
              {message.role === "user" && (
                <div className="flex-1">{message.content}</div>
              )}
              {message.role !== "user" && (
                <pre className="flex-1 text-pretty">{message.content}</pre>
              )}
              { /* Upvote button */}
              {!!stepId && (
                <button onClick={() => console.log(message.id, stepId)}>
                  👍
                </button>
              )}
            </article>
          );
        })}
      </section>
      
      { /* ... */ }
    </main>
  )
}

Here’s what our application looks like now:

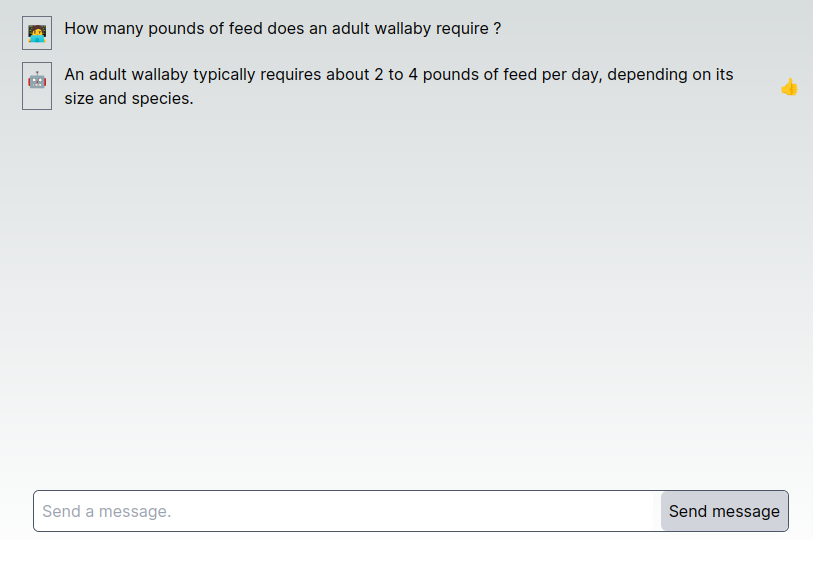
Our simple chatbot, now with thumbs up

To gather the user’s feedback and send it to Literal, we have to create a simple API route that takes as its input a Step ID, and a vote value (1 for 👍, 0 for 👎).

src/app/api/score/route.ts
import { LiteralClient } from "@literalai/client";

const literalClient = new LiteralClient();

export async function POST(req: Request) {
  const { runId, score } = await req.json();

  // Right now we have the ID for the Run however what we're really scoring is the Step
  // We fetch it simply as it should be the only child Step of the Run
  const res = await literalClient.api.getSteps({
    filters: [{ field: "parentId", operator: "eq", value: runId }],
  });

  const step = res.data[0];

  if (!step) {
    throw new Error("No step was found for the given runId");
  }

  // Send a score for the step
  await literalClient.api.createScore({
    stepId: step.id,
    name: "simple-chatbot-score",
    type: "HUMAN",
    value: score,
  });

  return Response.json({ ok: true });
}


Now we just need to plug the 👍 button to our new API route:

src/app/page.tsx
// ...

export default function Home() {
  // ...
  const handleScore = ({
    messageId,
    upvotedRunId,
    upvote,
  }: {
    messageId: string;
    upvotedRunId: string;
    upvote: boolean;
  }) => {
    fetch("api/score", {
      method: "POST",
      headers: { "Content-Type": "application/json" },
      body: JSON.stringify({ runId: upvotedRunId, score: upvote ? 1 : 0 }),
    }).then(() => {
      if (upvote) {
        setUpvotedMessages([...upvotedMessages, messageId]);
      }
    });
  };
  
  return (
    <main className="min-h-screen">
      <section className="mx-auto w-2/3 mt-10 mb-20">
        {messages.map((message) => {
          const mappedRunId = messageIdMapping[message.id];
          const isAlreadyUpvoted = upvotedMessages.includes(message.id);

          return (
            <article key={message.id} className="flex gap-3 my-3">
              // ...
              {!!mappedRunId && (
                <button
                  onClick={() =>
                    handleScore({
                      messageId: message.id,
                      upvotedRunId: mappedRunId,
                      upvote: true,
                    })
                  }
                  disabled={isAlreadyUpvoted}
                  className={isAlreadyUpvoted ? "" : "grayscale"}
                >
                  👍
                </button>
              )}
            </article>
          );
        })}
      </section>
      /* ... */
    </main>
  )
}

Now you can upvote messages in your conversation, and if you navigate to the corresponding thread in Literal AI you can see that the Assistant Run has been scored:
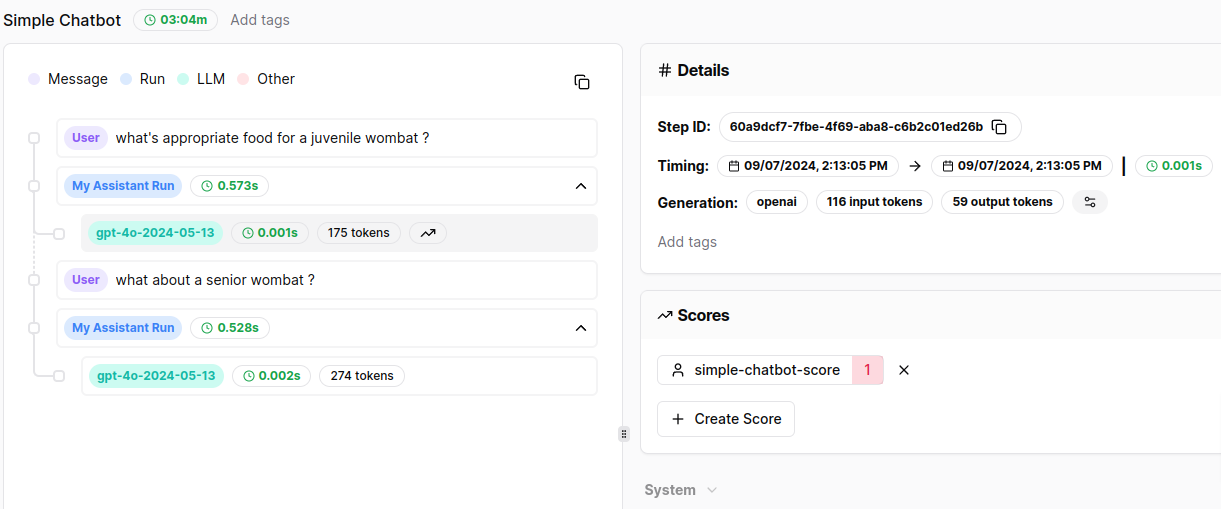
Step with score

Conclusion

Congratulations on building your own monitored chatbot! As you can see, one of the priorities of Literal AI is to make it easy to integrate with your existing codebase, while providing powerful tools to monitor and improve your AI applications. Here is a rundown of the features we have implemented in this tutorial, and how they will affect the lifecycle of your chatbot:

  • System Prompt: By decoupling the prompt from the code, you can iterate on system prompts and LLM settings, without leaving your web browser - and without having to redeploy your application!
  • Monitoring: By logging each conversation in a structured way, you can easily replay all the interactions between your users and your chatbot.
  • Human Evaluation: By allowing your users to score the chatbot’s responses, you can now passively gather a dataset of known good interactions. Because each of these interactions is linked to a specific Prompt version, you can easily evaluate the impact of prompt variations and LLM settings on the chatbot’s performance.

To dive deeper into evaluation, check out our other Guides & Tutorials, or learn more about what Literal AI can do for you by visiting our website.